Mountain bike tire pressure is a crucial aspect of enjoying a comfortable and efficient ride on the trails. Navigating various terrains can be significantly impacted by the quality of your ride, traction, and control. As avid mountain bikers, we know that finding the optimal tire pressure for your specific bike and riding style can make a difference.
There’s no one-size-fits-all recommendation for mountain bike tire pressure, as it depends on factors such as rider weight, tire size, and trail conditions. Generally, mountain bike tires recommend a range of 22-35 PSI. However, it’s always best to check the manufacturer’s guidelines and adjust your pressure based on your own preferences and needs. Larger, wider tires typically allow for lower pressures, increasing surface area and improving grip as we head to the beach.
As we experiment with different tire pressures, we’ll likely experience significant differences in the way our bikes handle, corner, and absorb impacts. This makes it important to invest some time in fine-tuning our tire pressures, ensuring a well-balanced performance that aligns with our riding preferences and local trail characteristics.
Understanding Tire Pressure
Psi and Bar Measurement
When considering mountain bike tire pressure, it’s essential to understand the units of measurement. The most common unit used to measure tire pressure is pounds per square inch (PSI). However, another unit called bar is often used, especially in Europe. To convert PSI to bar, remember that 14.5 PSI equals 1 bar.
Pounds per Square Inch
Tire pressure is crucial for optimal performance and comfort while riding your mountain bike. We recommend a range of 22-35 PSI for most mountain bike tires, but always check the manufacturer’s recommended pressure range for your specific tire (source). Adjusting your tire pressure within this range can significantly impact the handling, traction, and rolling resistance of your bike on various terrains.
Higher PSI values result in a firmer tire, which can help maintain rolling speed and prevent flats when taking hard hits on rough terrain. On the other hand, lower PSI results in a softer tire with better traction and a more comfortable ride but may increase the risk of pinch flats.
Tire Width and Volume
Another important factor to consider when setting your mountain bike tire pressure is the tire width and air volume. Wider tires require less pressure for optimal performance due to their increased air volume. For example, if you’re running a 2.6-inch tire, you may want to drop the pressure to around 19 PSI in the front and 21 PSI in the rear compared to a narrower tire (source).
Different disciplines in mountain biking, such as cross-country, trail, enduro, and downhill, often require adjustments to tire pressure for the best results. This is because each discipline presents unique challenges, and the ideal tire pressure varies depending on factors like terrain, riding style, and tire width.
Remember, when experimenting with tire pressure, it’s crucial to monitor how your bike handles and performs under different conditions. It’s a good idea to make small adjustments and gradually find the sweet spot that works best for you and your riding style.
Impact of Terrain on Tire Pressure
Type of Terrain
When setting the tire pressure for our mountain bike, we need to consider the type of terrain we’ll be riding on. For instance, on smooth and hard-packed trails, we may want to use a higher pressure of around 25-30 PSI. However, if we’re going to ride on loose or soft surfaces like sand, mud, or gravel, we might opt for lower pressures to improve traction and shock absorption.
Trail Conditions 🛤️
The conditions of the trails we plan to ride also play a crucial role in determining the ideal tire pressure. Wet or slippery trails can demand different tire pressures compared to dry, hard-packed surfaces. Generally, we should lower our tire pressure slightly in wet conditions to increase the tire’s contact area with the ground, thus providing better grip.
Obstacles and Ground Features 🪨
Mountain biking often involves encountering various obstacles and ground features, including rocks, roots, and jumps. Such rugged terrain can pose challenges to our tires and demand proper tire pressure adjustments. For example, if we expect to ride over many rocks and roots, a slightly higher tire pressure may be helpful to prevent pinch flats and improve handling. On the other hand, if we plan to tackle jumps and drops, we might consider slightly lowering the tire pressure to ensure better shock absorption and a more stable landing.
What is the Ideal Tire Pressure?
Factors Affecting Tire Pressure 🛞
When it comes to mountain bike tire pressure, several factors can influence the ideal pressure for each rider. Some of these factors include:
- Tire size: Wider tires can typically run at lower pressures, as they have a larger surface area that distributes the rider’s weight more evenly 1.
- Rider weight: Heavier riders may require higher tire pressures for optimal traction and control.
- Terrain: Softer or more uneven terrain may call for lower tire pressures to enhance grip, while harder or smoother surfaces may benefit from slightly higher pressures.
- Tubeless or tubetype: Tubeless tires can generally run at slightly lower pressures than their tubetype counterparts 2.
It is important to consider these variables when finding the ideal tire pressure for your mountain bike.
Finding the MBT Sweet Spot 🚵♂️
There is no one-size-fits-all when it comes to mountain bike tire pressure. The sweet spot varies depending on the factors we’ve mentioned above. However, most mountain bike tires recommend a range of 22-35 PSI 3, but it is always best to check the manufacturer’s guidelines.
To find your sweet spot, follow these steps:
- Inflate your tires to a few psi over the manufacturer’s maximum recommended tire pressure 4.
- Ride your bike for a bit to warm up the tires.
- Adjust the pressure incrementally, testing the ride quality, control, traction, and comfort after each adjustment.
- Take note of how the bike feels at different pressures, and find a balance between performance and comfort that works best for you.
Remember that finding the ideal tire pressure for your mountain bike may require some trial and error, but taking the time to find the sweet spot will lead to a better overall riding experience.
Footnotes…aka Resources we Like
- Mountain Bike Tire Pressure Calculator + Chart – MTBS&F
- The Right Mountain Bike Tire Pressure: Tips For Optimal Performance
- Mountain Bike Tire Pressure: Everything You Need to Know
- How to Dial the Perfect MTB Tire Pressure | GearJunkie
Tube and Tubeless Tire Pressures
Tubeless Benefits
We’ve found that using tubeless tires on your mountain bike can offer several advantages over traditional tires with tubes. One of the most significant benefits is puncture resistance. By eliminating the inner tube in a tubeless system, there is less opportunity for objects to puncture your tire casing. In addition, tubeless sealant can quickly seal small punctures and cuts, allowing you to continue riding without having to stop and fix a flat.
Other advantages include the ability to run lower pressures, which can improve traction and cornering grip, and a reduction in rolling weight. Lower pressures in tubeless tires can also lead to a reduction in tire damage, as it can help prevent pinch flats from occurring when hitting rocks or other obstacles. Furthermore, lower air pressure can better absorb trail bumps, providing a more comfortable and enjoyable ride.
Tire Pressure Differences
When comparing tube and tubeless tire pressures, it’s important to consider that they typically require different pressure ranges. For beginners using tubeless tires, a general guideline would be to start with a front tire pressure of 27 PSI and a rear tire pressure of 30 PSI. However, if you’re still using tubes, a recommended starting point is a front tire pressure of 32 PSI and a rear tire pressure of 35 PSI.
When it comes to mountain bike tire pressure, the width of the tire plays a crucial role in determining the appropriate pressure range. Here is a general guideline based on tire widths found in Bikexchange:
| Tire Width | Pressure Range (PSI) |
|---|---|
| 2.1″ | 18 – 26 |
| 2.25″ | 17 – 25 |
Keep in mind that the optimal tire pressure can also be influenced by your weight, riding style, and the trail conditions. Therefore, it’s essential to experiment and find the ideal tire pressure for your specific circumstances. Remember to always use a reputable air gauge to measure the PSI, and ensure to check your tires’ recommended pressure range, usually printed on their sidewalls.
Pressure Tools and Techniques
Tire Pressure Gauges
One essential tool for maintaining optimal tire pressure is a reliable tire pressure gauge. There are several types of gauges available, including analog and digital gauges. Analog gauges are simple and inexpensive but may be less accurate than digital gauges. Digital pressure gauges, on the other hand, are known for their accuracy and ease of use. Whichever type you choose, it’s essential to have a gauge that’s specifically designed for mountain bike tires.
Bike Pumps and Inflation Methods
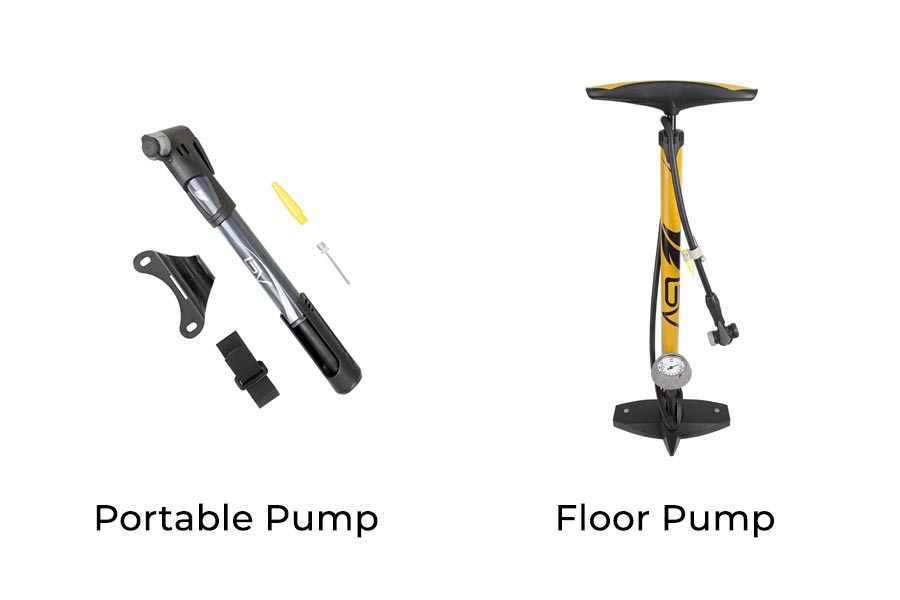
To achieve proper tire inflation, we recommend using a dedicated bike pump. Bike pumps come in various styles, such as floor pumps, hand pumps, and CO2 inflators. Floor pumps offer the advantage of stability and efficiency, making it easier to achieve higher pressures. Hand pumps are compact and portable, ideal for on-the-go tire pressure adjustments but can require more effort to reach the desired PSI. CO2 inflators are excellent for emergency situations, providing instant tire inflation with minimal effort; however, they may not provide precise pressure control.
When inflating mountain bike tires, the following best practices can help ensure proper pressure:
- Inflate tires to the manufacturer’s recommended PSI range for optimal performance.
- Check tire pressure before every ride, as fluctuations in ambient temperature and fluctuations can affect PSI.
- Make small adjustments to tire pressure to fine-tune performance based on terrain and riding style.
Valve Types
Mountain bike tires typically have one of two types of valves: Presta or Schrader. The Presta valve is a narrow and threaded design commonly found on road and mountain bikes, whereas the Schrader valve is a wider and fully threaded design often seen on automobiles.
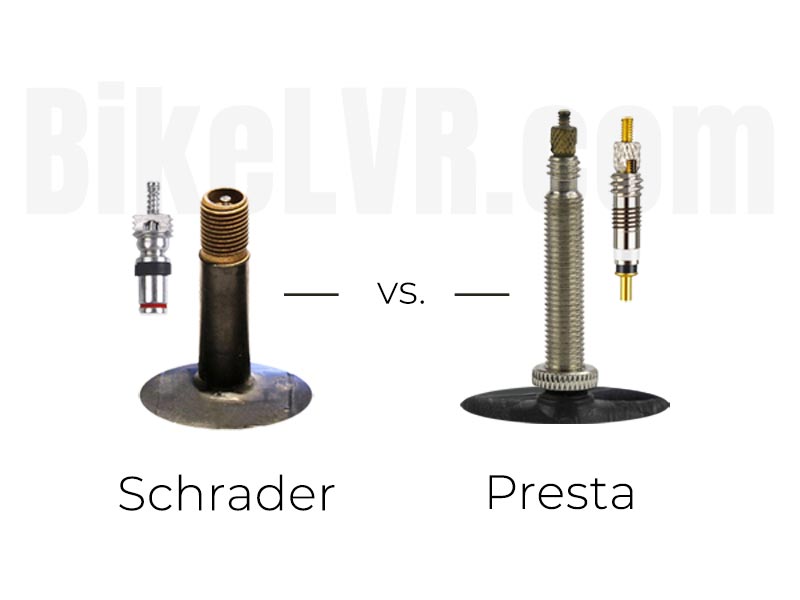
To use a Presta valve:
- Unscrew the valve cap and loosen the brass nut on top of the valve stem.
- Press down on the valve stem to release a small amount of air and confirm the valve is open.
- Attach the bike pump nozzle and inflate the tire to the desired pressure.
- Close the brass nut, ensuring it is tight to prevent air leakage, and replace the valve cap.
For Schrader valves, simply remove the valve cap, attach the bike pump nozzle, and inflate the tire to the desired pressure before replacing the valve cap.
If your mountain bike tires feature a tubeless valve, the inflation process is similar to that of a Presta or Schrader valve. Make sure to use a pump compatible with tubeless tires, as they often require higher pressure to seal correctly.
Tire Pressure Effects on Riding Styles
In this section, we will explore the importance of tire pressure and its impact on various mountain biking courses, including XC, Trail, Enduro, and Downhill. Understanding the optimal tire pressure for your specific riding style allows you to have better control, performance, and comfort on the trails.
XC (Cross Country) MTB
For XC riding, it’s crucial to maintain a balance between speed and traction. We generally recommend tire pressures between 25-35 PSI for cross-country riders. This range provides a good contact patch for gripping the trail while keeping rolling resistance low. However, factors such as rider weight, bike weight, and terrain will also play a role in determining the perfect pressure. Lighter riders or those with lighter bikes might go toward the lower end of the range, while heavier riders or those with heavier bikes might need slightly higher pressures.
Trail MTB
Trail riding involves varied terrain and requires a comfortable ride and confident braking. We suggest tire pressures between 20-30 PSI for trail riders. A lower pressure will provide better traction and a larger contact patch, which is essential for navigating loose or slippery terrain. This range is versatile enough to accommodate different trail surfaces and bike suspension setups, but always remember to adjust it based on your personal preferences and trail conditions.
Enduro MTB
Enduro riding involves both climbing and descending, making it important to have a tire pressure that balances grip, rolling resistance, and durability. We recommend tire pressures between 22-28 PSI for enduro riders. This pressure range ensures that the tire casings can withstand rough trail conditions without compromising performance during technical ascents and descents. Since Enduro bikes often have more suspension and are ridden more aggressively, this pressure range will help prevent flat tires while providing a comfortable ride.
Downhill MTB
Downhill riding is all about speed and control on steep, technical terrain. In this discipline, puncture resistance and grip are a priority, so we advise using tire pressures between 18-25 PSI for downhill riders. Lower pressures enhance the contact patch, which improves braking and cornering grip on loose, rocky, or rooty surfaces. Additionally, downhill bikes may have heavier frames and more suspension travel, so the suggested pressure range should reduce the risk of flats during hard landings or impacts.
Remember to take into consideration your riding style, bike weight, suspension, and the specific terrain you are riding on when choosing the appropriate tire pressure. Adjustments may be needed to fine-tune your experience on the trail.
When do I make Mountain Bike Tire Pressure Adjustments?
Weather Conditions and Temperature 🌡️
Adjusting tire pressure based on weather conditions and temperature is critical for optimal performance on the trails. For example, in wet or muddy terrain, we recommend lowering the tire pressure by 0.1 to 0.3 bars in order to maximize grip. This also applies to rocky terrain, where lower tire pressure can enhance control and stability. On the other hand, when riding on dry ground or roads, it’s beneficial to increase tire pressure by 0.1 to 0.3 bars for improved rolling resistance.
Temperature also plays a role in tire pressure adjustments. Cold weather can cause tire pressure to drop, so be sure to check and adjust it accordingly before hitting the trails.
Rider Experience and Skill Level
Different rider experience levels can benefit from various tire pressure settings. Beginners may want to start off with the following suggested pressures:
- Tubeless tires: 27 PSI (front), 30 PSI (rear)
- Tires with inner tubes: 32 PSI (front), 35 PSI (rear)
These starting pressures are designed to prioritize safety and stability for new riders, gradually shifting to optimal tire pressures based on individual skill and comfort level.
Advanced riders may opt for lower tire pressures in certain conditions, allowing for better grip while cornering and navigating technical sections of the trail. However, it is essential to find a balance to avoid burping (air loss in tubeless tires) or compromising puncture protection.
Other Considerations
- Wider tires: Generally, wider tires can run at lower pressures, providing better grip and conformity to the trail surface.
- Wheel size: The size of the wheels can also affect the optimal tire pressure. Larger wheels may require slightly higher pressures to maintain stability.
- Riding style: Riders who tend to ride aggressively and tackle rough trails may benefit from higher tire pressures for added support and puncture protection.
Ultimately, it’s crucial to experiment and find the tire pressure that works best for your riding style, bike setup, weight (I’m 240 pounds) and the specific trail conditions you encounter. Remember to regularly check and adjust tire pressure as needed so you can consistently enjoy a safe and enjoyable riding experience.
Potential Tire Pressure Issues
Mountain bike tire pressure plays a significant role in the overall performance and safety of your ride. In this section, we will discuss some common issues related to tire pressure, such as pinch flats, tire tread, puncture risks, and pressure-rim compatibility.
Pinch Flats
Pinch flats, also known as snakebite punctures, occur when the tire is underinflated and gets compressed between the rim and an obstacle like a rock or a root. This results in two parallel cuts on the inner tube. To minimize the risk of pinch flats, ensure your tire pressure is within the recommended range. Proper tire pressure will vary depending on factors like tire size and rider weight. For example, a 29-inch x 2.6 tire can be safely inflated to 24 PSI.
Tire Tread and Puncture Risks
Inadequate tire pressure can affect the tire’s tread and overall grip on the riding surface. Overinflation can lead to reduced traction, as less of the tire’s tread makes contact with the ground. Underinflation, on the other hand, increases the chances of puncture risks caused by sharp objects on the trail. For tubeless tires, a starting tire pressure of 27 PSI on the front and 30 PSI on the rear is recommended. Riders using inner tubes can begin with 32 PSI on the front tire and 35 PSI on the rear.
Pressure and Rim Compatibility
Tire pressure should always be compatible with the rim width to ensure optimal performance and safety. Each tire and rim combination has a recommended pressure range. Exceeding or falling below this range can lead to:
- Poor handling
- Tire bead unseating
- Damage to the rim or tire
As tire size increases, air pressure requirements may decrease. For example, a wider rim may allow for lower tire pressure without increasing the risk of pinch flats or compromised handling. Ensuring proper tire pressure for your specific rim and tire size will help you avoid these issues and optimize your mountain biking experience.
MTB Tire Pressure FAQ’s:
What’s the ideal mountain bike tire pressure? The ideal tire pressure for mountain bikes can vary depending on factors like the rider’s weight, terrain, and tire width. However, most mountain bike tires recommend a range of 22-35 PSI.
- Lighter riders: Lighter riders can get away with running lower tire pressures, as they are less likely to bottom out their tires on bumps. A good starting point for lighter riders is 22-25 psi.
- Heavier riders: Heavier riders will need to run higher tire pressures to support their weight. A good starting point for heavier riders like me is 28-32 psi.
How does tire pressure affect performance? Tire pressure plays a crucial role in the way your mountain bike performs. Higher pressures offer less rolling resistance and make it easier to maintain speed on smooth terrain. Lower pressures provide better traction over rough terrain and reduce the risk of punctures.
- Rolling resistance: Rolling resistance is the force that resists the motion of a tire rolling on a surface. Higher tire pressure increases rolling resistance, while lower tire pressure decreases rolling resistance. This means that tires with lower tire pressure will roll more easily, which can improve efficiency and acceleration.
- Traction: Traction is the ability of a tire to grip the road surface. Higher tire pressure decreases traction, while lower tire pressure increases traction. This means that tires with lower tire pressure will have better traction as snow or sand.
- Handling: Handling is the ability of a bike to turn and maneuver. Higher tire pressure increases handling, while lower tire pressure decreases handling. This means that tires with higher tire pressure will be easier to turn, while tires with lower tire pressure will be more stable at high speeds.
- Ride comfort: Ride comfort is the level of vibration and harshness that is transmitted to you. Higher tire pressure decreases ride comfort, while lower tire pressure increases ride comfort. Lower tire pressure translates to a smoother ride quality, whereas higher tire pressure enhances the tire’s capacity to respond to varying road textures.
Should my front and rear tire have different pressures? Yes, it’s common to have different pressures for the front and rear tires. For example, a beginner trail rider running tubeless tires might start with 27 PSI in the front and 30 PSI in the rear. This setup provides a balance between traction, reducing rolling resistance, and avoiding flats.
How do I check my tire pressure? To measure your tire pressure, simply attach an air gauge to your tire’s valve. Tire pressure is measured in pounds per square inch (PSI), although bars (bar) and pascals (Pa) are other units of measure.
How often should I check and adjust my tire pressure? We recommend checking your tire pressure before every ride. Changes in temperature, small leaks, and regular use can cause fluctuations in pressure, so it’s important to ensure your tires are within the recommended range for optimal performance.
Remember, these are just guidelines, and it’s crucial to find the tire pressure that works best for you! Its personal so experimenting with different pressures and paying attention to how your bike feels on the trails will help you fine-tune your setup for the best possible experience.
